Thursday, August 4, 2011

When life gives you lemons, make lemonade


While on a recent trip I spied a wonderful scarf in a boutique. It was made of little silk squares about an inch wide joined by thread and fancy yarn. It was bound in silk and had a lovely airy look and feel. I thought that I could duplicate it and tried a small sample when I got home with no binding. I pinned the squares to water soluble stabilizer then sewed between the squares with rayon thread, then couched some interesting yarns, then washed away the Solvy. I was so disappointed with the stiff, crooked thing I had created. Not at all like the pretty scarf I had seen. Lemons for sure!

But the more I looked at it, pinned to my design wall, the more I liked it. So I made some more in different colors, but all in the same color family. They are quite stiff and could be softer if I washed out the Solvy more throughly, but I like the stiffness and sculptural quality.


The "fabric" that they are pinned to are dye-grabber sheets. I now put one in all my washes when I do my hand dyes. I have used them before in quilts and like the somewhat leathery texture they get when quilted. They are very durable, made from some kind of non-woven material.

These little wonky units may or may not go into the big green quilt that I recently started working on again. I had put it away but resurrected it last week and I'm piecing away again. I blogged about it here.

Lemonade? What do you think?

Monday, August 1, 2011

Succulents

I wish all plants were as easy to grow as succulents. With a nice sunny spot and very little water they will give you a splendid display all summer long and, if you're lucky, into the winter inside the house.

Here's a new pot I put together at the beginning of the season. I mostly leave it alone and let it get watered when it rains. It's in a pretty grayish blue pot that looks good with the blue/gray plant, the pinkish one and the trailing variety that hangs over the edge of the pot down to the table top. All pictures are clickable for a bigger view.

This little garden was put together by my friend, Carolyn, who has been growing this Hens and Chicks variety for years and is very generous about sharing. Thank you, Carolyn. You can see that the Hen in front has sprouted several little Chicks.


This was also new this year and is called "Mother of Millions".


Looking down at the plant you can see the little babies growing all along the sides of the leaves.


When they get big enough, they fall off and if they fall onto dirt will propagate into new plants. In my case they fall onto the glass table top, especially after a heavy rain, as we had this afternoon. The first picture of this plant, two pictures back, has quite a lot of babies knocked off. They were also all over the deck. Hmmmm....maybe the chipmunks will eat them.

Thursday, July 28, 2011

Caught in the Act

For the past few years I have grown a variety of tomatoes, called Sun Gold. They are a cherry tomato, a bright yellowy orange when ripe. They are sweet, juicy, succulent and I love to eat them warm right off the vine. I planted them quite small and have watched them get tall and vigorous with my daily waterings and weekly feedings. I picked a few a couple of weeks ago and have been eagerly awaiting the ripening of the rest. Before I went away for a few days last week, I had several that were starting to turn yellow. I anticipated a nice handful to pick when I got home. Nothing! I was perplexed. Every day I go out and check and.....nothing! I began to suspect a varmint.

Here's a nice cluster of green ones, still not ripe. This morning I saw a half-eaten ripe one on the railing of the deck. Aha, the plot thickens!

Then later in the day I was reading inside by the window that overlooks the deck and I heard a plop that sounded like a falling tomato. I looked out to see the plant swaying and a chipmunk scurrying across the deck. A little later I heard the same noise and there he was a bold as could be climbing the plant. I had to stamp my feet and make a lot of noise before he ran away. Then I went and got my camera and the next time I caught him in the act and was able to snap this picture before he took off. I'm not sure if he's the only one or part of a group of thieves.

Don't tell me how cute he is! I want my tomatoes!! I wait for them all year, but doubt that I'll have them this year. I'll have to go to the farmer's market on Saturday. Do you have any suggestions as to how I can keep them away? I have two big containers with one big plant each.

Monday, July 25, 2011

Shibori surprise


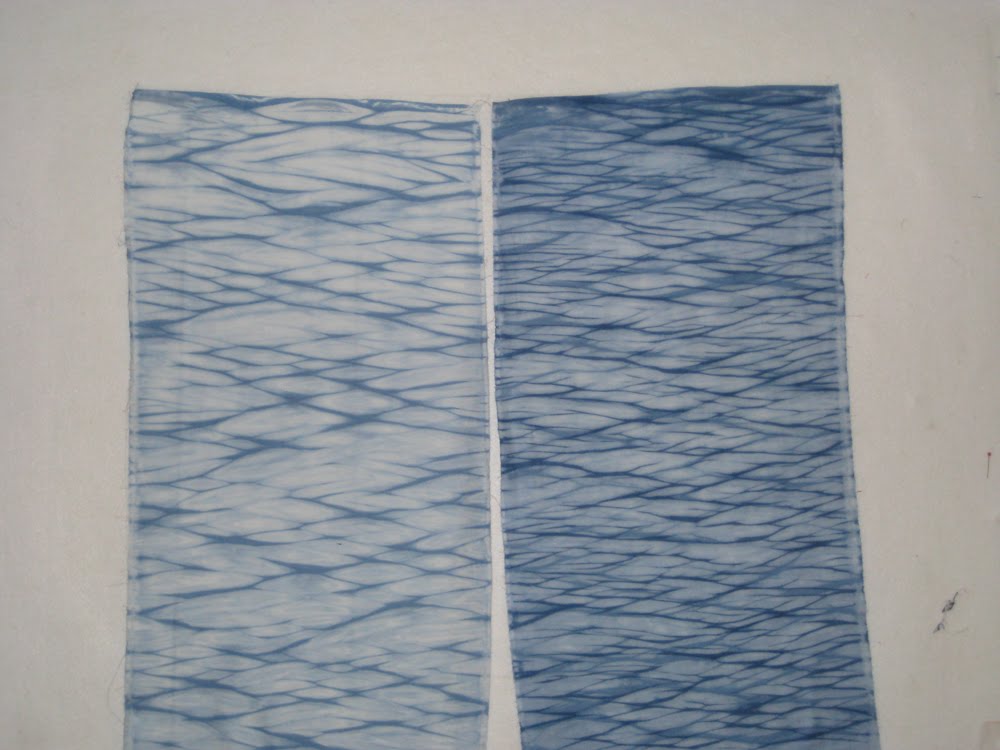
This will be my last post on Shibori for awhile because I've run out of PFD fabric and have to order some more. When I did my last batch I had an awful lot of dye left in the bucket and it seemed a shame to throw it away, so I experimented with putting in a small piece of white fabric to see it the dye was still viable after several hours. The fabric took the dye, although it was much lighter than the original batch. So I quickly sewed up two tubes of fabric to fit over the pipes, scrunched it down and put it in the dye pot for a couple of hours. When I rinsed it out, I had the nice light blue on the left. I scrunched one of the them again and put it back in for an hour or two and got the results on the right. I guess I could have done more, but as I said, I was out of fabric.

From now on, when I do a batch, I will have another batch ready to go in the now weaker dye. Maybe I'm making my dye too strong, but I was happy with that deep dark color achieved on the first dip.

Sunday, July 24, 2011

And More Shibori

I've been away for a few days visiting relatives in upstate NY, where it should have been nice and cool. But it was just as hot as most of the rest of the country. We had a delightful time anyway, getting to see some relatives that we haven't seen in ages. The visit was mainly for a memorial for my first cousin who passed away this winter and it was bittersweet because of that.

Before I went I did some more shibori experimenting. Here are just a few of the results.


This was done by wrapping the fabric on the poles diagonally, then wrapping with thread before scrunching down. It was much more labor intensive than sewing a tube and scrunching down and I don't think it was worth the extra effort.


Here's the sewn tube scrunched down, this time done on a pre-dyed fabric. Reminds me of tiger stripes. I did this in a couple of colors.


This is the tube sewn, scrunched down version again. After rinsing and washing, the one on the left was done a second time in the same color dye. I like the intense, close together look of the wiggly stripes.


I experimented some more with doing the sewing by machine. I put Jeans Stitch thread in the bottom and was able to get it pulled very tight before dyeing. The results are not bad, but not as good as hand sewn.


Here is a good example of hand sewn versus machine sewn. They were both done in the exact same pattern of half circles sewn on a folded strip. The one on the left is hand sewn and a much crisper design.


These last three are a few of the folded and clamped designs I tried. I accordion pleated them, pressing each pleat as I went with a hot iron. After pleating and folding, a wooden shape was clamped onto each side of the bundle and submerged into the dye. The wooden shapes bought at Michael's, came in various shapes and sizes and were quite inexpensive. I think I achieved some very interesting patterns. This first one was folded into triangle shapes and used wooden triangles. I did these in different sizes.

I did several circle ones using different sized circles and different widths of folds.


This used a fun flower shape. It's rather whimsical, but I'm not sure if I would use it in a quilt.

I'll do one more posting tomorrow with what was a pleasant surprise for me.

Tuesday, July 19, 2011

Good News!

I was so pleased today to get the email notification that my quilt, "Of Cabbages and Kings" has been juried into the IQA show, Quilts: A World of Beauty in Houston this fall. This is a whole cloth painted quilt that was quilted using free-motion satin stitch.


Detail.

Last year was the first one in seven years that I did not have something in the show. I didn't enter because I just didn't have anything that I thought was right. This year I entered two and this was one accepted. So I will be going to Houston again this year. It's always a wonderful experience.

Saturday, July 16, 2011

More Shibori

These next four Shibori samples involve stitching by hand using a strong thread and then pulling it all up very tight before putting it in the dye bath. Be sure to click on each picture for a bigger view.

This one is rather tedious. I drew the wavy lines with water soluble graphite pencil and then folded on each line so that I was sewing through two layers of fabric very close to the fold.


It was suggested that I try machine stitching and this is the result. While it was a cinch to sew, pulling up the threads was not. I was so afraid of them breaking and I didn't get them evenly pulled. But I am going to try it again, using Jeans Stitch thread in the bobbin. That would make it easier to pull tight.


This was done with just straight rows of running stitch by hand, I am using that Jeans Stitch thread by YLI for all my hand stitching. It is very strong and won't break, no matter how hard I pull.
Several people thought that they saw "people" in this piece. Do you?


This is one of my favorites, although it is rather tedious, too You fold your fabric in half length wise then draw concentric half circles in a row. First sew all the larger circles, jumping from one circle to the next without cutting the thread. Do all three rows this way then pull up all the 3 threads tightly. Put in dye-bath.

After the dye bath for all of these, you rinse and rinse then take out the stitching, wearing rubber gloves unless you want blue hands. Then wash in the washing machine in hot water with Synthropol, a soap meant for removing excess dye.

Now I am doing more pole wrapping in a different manner that the ones I showed yesterday and more stitch resist and folding and clamping. For now I am sticking to blue and white, but plan to branch out to other colors or color over color. The possibilities are endless. Stay tuned!

Friday, July 15, 2011

Shibori

I mentioned in my last post that I was going to do some Shibori. If you are unfamiliar with the word, it is a Japanese term for the dye-resist technique of binding, clamping, or gathering fabric so that the dye cannot reach certain parts. The results are very interesting and often unpredictable. The traditional way of doing it is with Indigo dye, a complicated and messy process, but I have used MX reactive dyes in an Indigo color. Here are just a few of the samples that I've done over the past few days, starting with the easiest.

This was a piece of fabric that was folded accordion style then tied loosely with thread to keep the stacked shape.


This piece was folded in the same accordion pleat style but bound tightly with thread to form a tight roll. See how the dye could not penetrate the center and left many more white spaces.


These next two pieces were made by sewing a 45" tube of fabric to fit a PVC pipe 4" in diameter. I scrunched the fabric as tightly as I could to compress it toward the bottom of the pole.
After the fabric is prepped, it is submerged in the dye for a few hours, then taken out, unfolded or unscrunched, rinsed and washed.

Please come back tomorrow to see some stitched Shibori with some fascinating designs.