Sunday, September 30, 2012

New York, New York

As I've said before, I 'm so lucky to live so close to New York City and all it has  to offer.  Yesterday we went in for a matinee of Nice Work If You Can Get It. It was such a fun show! The story was quite silly and farcical, but the music was delightful.  It's hard to go wrong with Gershwin.  This was a musical comedy built around some old Gershwin favorites like the title song and Someone to Look Over Me, S'Wonderful, Fascinating Rhythm, I've Got a Crush On You, and so many others that you had to bite your tongue to keep from singing along.
The two leading roles were taken by Matthew Broderick and Kelly O'Hara. Brodereick is still so adorable and the part was perfect for him.  I fell in love with O'Hara in South Pacific and she was equally winsome in this role with her fabulous voice and appealing looks. I loved the costumes of this Prohibition era and the singing and dancing were over the top.
If you want to see a show that keeps you grinning from ear to ear and often laughing out loud and singing the songs for the next several days, then this is a show for you.  


Of course one of the best parts of the day is always the lunch before the show.  We went to Le Rivage, a charming little French restaurant where I had eaten before.  I had one of my favorite French dishes, frog's legs. They were done to perfection with the prerequisite butter and garlic. Delish!

Friday, September 28, 2012

Simple Pleasures

"Endless Summer" hydrangea still blooming and setting bud at the end of September.

Wednesday, September 26, 2012

Shibori Surprises

One of my art quilt groups, FANE, has started a new Renga project, but this one has a twist.  We are each to make one half yard of fabric, starting with white, and do an all over surface design. It can be dyed, stamped, foiled, paint sticked, painted, etc.  Any surface design that does not include stitching, beading or fusing.  After we make our half yard, we are to cut it in half and at the next meeting those two halves will be given to other people to do another layer of surface design.  Then those two pieces will be cut in half again and they will be passed on.  At the end we will each get back our original fabric, but now in four pieces with three layers of surface design.  Are you confused yet?

Still having fond memories of my shibori workshop with Jan Newbury-Meyrs in my head, I knew that my half yard would have to be shibori.  Jan's recipe calls for two tablespoons of dye, so I went with a color of which I had a lot......turquoise.


For my first batch I did three pole wraps on 4" diameter poles and one rope wrap. They are L to R, diagonal pole scrunch, rope scrunch, diagonal pole wrap with string and another pole wrap with string.
At the end of the required 75 minutes in the dye pot, they were washed and ironed. I loved the color!  You are only seeing a small section of each, but they are scrumptious.  I couldn't bear throwing all that dye left in the pot down the drain, so I made up some more pole wraps and left them in the dye bath overnight.


This is the second batch.  In person there is not as much contrast between the two batches.  I think they are still yummy, though more delicate.  Again I couldn't bear to throw the dye away, but I didn't want any more turquoise. So I added some yellow to the pot, hoping for lime green.


When these came out of the dye bath they were bright Kelly green, not what I wanted, but still pretty. You can imagine how delighted I was when they came out of the washing machine this delicious lime green. The markings are not as distinct as they were on the turquoise, but still quite lovely.
And, yes, I did throw the dye away after that batch, but I wonder how long I could have kept it going.
In Jan's class it was dumped after the first use, but then she wanted sharp definitions.

Now my big dilemma is which one I should  use for the Renga project .  Decisions, decisions.

Saturday, September 22, 2012

Autumn on the Mantel

Back in July I wrote about Summer on the Mantel, with a quilt I had made called "Ocean Treasures" and some faux coral.  With a nip in the air and yesterday being the first official day of Fall, I thought I'd better make the change in my mantel, too.

I made this quilt several years ago, using real leaves I found on my morning walks for patterns.


I found these adorable patchwork feathered friends at a favorite shop that regretfully has gone out of business.  It looks like the rooster is calling over his shoulder and telling his hens to stop gabbing and get a wiggle on.

We're coming, we're coming!

Thursday, September 20, 2012

Welcome Home


I was so glad to get this little quilt back today.  It has been traveling for three years as part of a
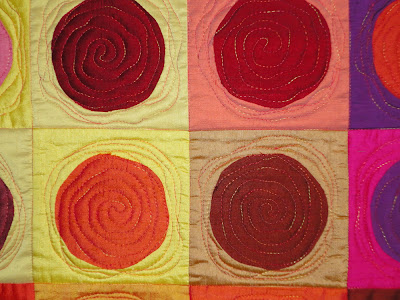
 Fiber Revolution exhibit. Actually it is a replacement for the original quilt in this exhibit, which was sold in Botswana, Africa. I was asked if I would like to make a replacement so that it would be part of the traveling exhibit.  The first one, Botswana Suns, was very similar, using all the same colors of Dupioni silk, but with a different arrangement of blocks and circles. It's such a happy little quilt that I think I will try to find a place to hang it in my house.


Hot Spots II   30" x 30"


Hot Spots II --Detail

Sunday, September 16, 2012

Itajime Shibori

 When I took the shibori class with Jan Myers-Newbury, I was hoping to learn how she made her quilts with those circles and squares of different colors within a pole wrapped piece and I did learn how to do that, but somehow that's not what I came home with.

For the first three days of the class we learned many different techniques and used many different colors. As I finished a piece I slapped it up on my design wall in no particular fashion.


At the end of the third day of experimenting, we had to decide on a plan for our fourth day of intense dyeing.  I wasn't in love with anything I had done, but I did like that piece in the upper right corner.  It was an itajime (folded and clamped)  piece.  At least two of the women in the class were scientists and they came with some unusual things to share that were great for itajime.  I used a pair of pippet holders to get that polka-dotty image.   Be sure to click on the picture to see those dots.


I tried putting that piece with others of similar color.  These pieces were all dyed in different blacks. Those tiny rectangles are samples of the three blacks she had available. When Jan came around to give advice, she also liked that piece, but didn't like putting it with those that I had chosen.  She suggested that I do more of the itajme, using the same triangular fold and experimenting with the same pippet holder and other clamping shapes and trying different under-painting colors and then dyeing them all in the same Black #3 (nickel)

So before we went home that evening, I under-painted several pieces of fabric, trying to capture the same feeling as the original and trying some new colors. 


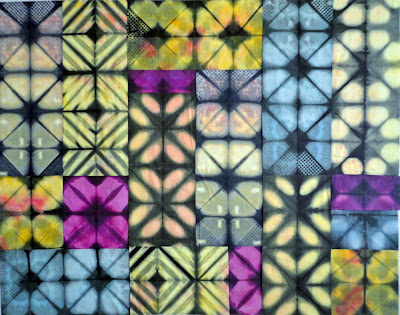
The last day was our big design day, no dyeing. We could wear nice clothes if we wanted.  I wish I had taken pictures of some of my pieces before they got cut up. After cutting, arranging and rearranging and some tweaking by Jan, this is the composition I ended up with.  Not at all what I had in mind when I took the class, but it is growing on me.


When I got home I tweaked it some more and added another column on the right. It's about 58" x 48".  I'm going to quilt it in three panels and then sew those quilted panels together (something I do all the time with great results), because that will make it so much easier but I don't know what quilting designs or lines I will use. I want to do a lot of free-motion quilting as I usually do. 

So what do you think?  Thumbs up or thumbs down?  Any suggestions for quilting designs?

As for learning how to do those techniques that Jan uses in her award winning quilts, well I did learn how to do them and I will definitely try them on my own.


Friday, September 14, 2012

Photo Graphic

This year my small quilt group, The Scrapbag Fiber Artists, chose Photo Graphic for our theme. We were to interpret a photo in any manner desired.  We could be realistic or abstract, be inspired by the colors, transform it in Photoshop, or anythng else that struck our fancy.  The show was hung at the Newtown Library while I was away at my workshop.  I got over to see it on Wednesday and here are the results.  Some of them I had not seen prior to Wednesday, so there were some pleasant surprises. 

Please click on any photo for a bigger view of all.  There are some details that you won't want to miss.


Andrea's Sitting Pretty

Carolyn's Brook Glen

Chris' View From Nike's Window

Margaret's Platycodon

Nike's Blue Leaf Fall

Norma's Impressions of Istanbul

Paula's Jackie's Garlic Bulbs

Barbara's Tomato Quartet
Susie's Grandson

Wednesday, September 12, 2012

Shibori class

Here are just a few samples from the shibori class I mentioned in my last post.  Each one uses a different technique or type of shibori.

Under-painted,  pleated, diagonal pole wrap, then dyed


Pleated, pole wrapped,.painted on pole and then dyed.


Diagonal pole wrap and dyed


Folded, clamped, dyed


Folded, clamped, diagonal pole wrap, painted on pole and dyed


Painted, pleated, straight pole wrapped, dyed

This is just a very small sampling. Most of them are about fat quarter size.  The ones I ended up using for my final composition are all Itajime, or fold/clamped. I am working on piecing it right now, so I can't show any of the pieces.


Monday, September 10, 2012

Dyed and Gone to Heaven

I returned yesterday afternoon from my five day work shop with Jan Myers-Newbury, Shibori Fabrics for Quilting at the Schweinfurth Art Center in Auburn, NY in the beautiful Finger Lakes region.

Before I show you any of the fabrics I made I want to tell you about the facilities.  It was the most amazing workspace, certainly the best that I had ever been in.

Remember to click on any picture for a bigger view of all.


First there was a huge "dry" workspace where we prepared our fabrics and did our designing. We each had a six foot worktable with two big design walls apiece and plenty of space between tables.


Another view of the dry area.  Notice the scrumtious colors painted on the walls.


Here's Paula, my most delightful travel companion and roommate, taking a break at her table in front of her design wall. We had so much fun together!


This is a partial view of the "wet" studio.  There were six stainless steel deep sinks, two low floor sinks for emptying big pails, two washers and dryers, several tables for working and a floor that could get wet and messy.  And it did! That's Jan on the left giving advice to Ruth.


Here we are stirring those pots, making sure the dye got evenly distributed on the fabric wrapped on poles and/or folded and clamped. The washers and dryers were in that alcove where Jan is standing.

Then there was another room with ironing boards and irons set up.  

I made a fair amount of fabric, but more important is the fact that I learned so much.  This was not just pole wrapping, although we did a lot of that, but also clamping, stitch resist, and underpainting. Jan was a fabulous teacher and if you ever get a chance to take a class or workshop, please do, you won't regret it.  I'll post again showing some of the results, so please come back.


Saturday, September 1, 2012

On to greener pastures


I made a few of these skinny wiggly strips in different shades of green.  Although I cut the fabric exactly the same for each one, they all came out a different size, since it is free form cutting and curved piecing with no pinning.  They surely wouldn't fit together that way.  So I took them all off the design board and measured them all and found the least common denominator and that was 4 1/2 " x 8 1/2" to sew down to 4" x 8".  Then I got out graph paper (haven't done that in ages) and crayons and made a few mock blocks to see how it would work. 

  
I came up with this block of three strips.


Then I put up the few strips that I had made to see how I liked the repeating blocks, and I do like it.  I want to make this a BIG quilt, as in 72" x 40".  That means 30 blocks with three strips apiece, that means 90 strips!  I have 12 made, so I only have 78 to go.  It takes about an hour to make each strip.  I wish I could be one of those people who can put in eight to ten hours a day sewing. Then it wouldn't take me that long, but I don't have the tenacity or work ethic, so this may take me awhile. My plan for now is to have very dark blocks in the upper left hand corner, then moving onto mid-tones in the center and then very light in the lower right hand corner. 

 I know that when I get back from my workshop, I'll be all gung-ho for shibori and this may get put on a back burner.  But I will finish it.