Saturday, August 29, 2020

Christmas in August

The card making bug hit me a couple of years and I have so much fun with it. I have so many supplies....stamps, inks, papers, embellishments, die cutter, embossing machine, etc. I make birthday cards, get well cards, sympathy, and thank you. So if I know it is your birthday, if you are not feeling well, you have done something nice for me or experienced a death of your near and dear, you will get a handmade card from me. 

Last year I made Christmas cards. I was only going to make a few, but had so much fun doing them that I made 45, enough for my whole Christmas card list. And I made the same amount this year. I only ordered one new stamp set from StampinUp and this time I ordered the matching dies. I liked this set because there were so many different ways to use them. I will only show you a few.


For this one I used the larger die to cut through the front of the card.


Inside the card you see the layered words, lots of fiddly gluing.


Same technique as the first card, except I just stamped the word. I liked the layered die-cuts better, even tho it was more work.


I did several variations of this. Lots of stamping and using those three layers of die cuts.


More of the same, this time adding some cute polka-dot ribbon. Don't know why the edges look wavy because they are not.


I think this is my favorite, even tho it was very labor intensive. I used the Sheltering Tree stamp set to stamp the tree, snow drift, and snow flakes. They were all heat embossed. Then I sponged on ink color using a sponge and ink directly from the ink pads. I made 6 of these.


Not a Christmas card, but a new-to-me technique. For the watercolor-looking square, I applied two colors of ink directly onto an acrylic square, misted it with water and then plopped it down onto the card and pressed down. When you remove the square you get this watercolor look. Then I stamped onto it with an old Hot Potato stamp that I have had forever and then flicked some ink onto the background. THEN I die cut a square from the watercolor part and put it back in place, popped up with dimensional squares, hard to tell from the photo. The true colors are little lighter and brighter than what you see. Even with editing, I could not get it to its actual color.


Same technique as the one above, but this time using a Stampin Up stamp from the Sheltering Tree collection. I love this stamp set and have used it so many times in many different ways. Again, true colors are lighter and brighter.


I spent the better part of this week making cards and now I am on to other things. I have to make a collage for my FiberWorks monthly challenge and then I want to play with my new Distress Ink Oxides. 

I am linking up with Off the Wall Friday. 


Saturday, August 15, 2020

Ta-Dah! Finished!

 I got the last of these little beauties sewn down to the 30" canvas last night and I must say that I am pleased with the results. It was very tricky getting them all aligned perfectly. I did a lot of measuring and moving around before I was satisfied. When I had them were I wanted them, I very carefully picked up one side and put down a piece of two sided masking tape to keep them in place. Then I sewed them to the canvas, trying to match the buttonhole stitch that I had put around the edge of each piece. Tedious.

The problem with this piece is its fragility. I could never put it in a show where it had to be mailed or even dropped off for someone else to hang. All of those little embellishments  could be crushed or broken.

If all goes well they will be hung at the end of Sept. in the Newtown Library for our annual show there. But we don't even know if the library will be open. We may just have to have a virtual show online. The name of the show is "A Walk in the Woods" and my piece is "Forest Floor".


If you have been reading anything about the progress of this piece, you will know that the one in the center is all hand embroidered. My original plan was to hand embroider all of them, but that was taking forever. The rest were stitched on the machine and the embellishments (tree lichen, moss, bark, twigs, etc.) were glued on. 

Click on the picture for a bigger view and click again for an even bigger view and you can see all the details.

I am linking up with Off the Wall Friday.

Sunday, August 2, 2020

More Forest Floor and a Collage

I finished the last two pieces of my Forest Floor. Now I have to attach the nine pieces to a 30" square black canvas.


I used some real tree bark and some wonderful eyelash yarn for the embellishments.


I puffed up the mushroom head again with a layer of wool batting. More of that fabulous yarn again and some real tree lichen, bark and twigs for embellishment.


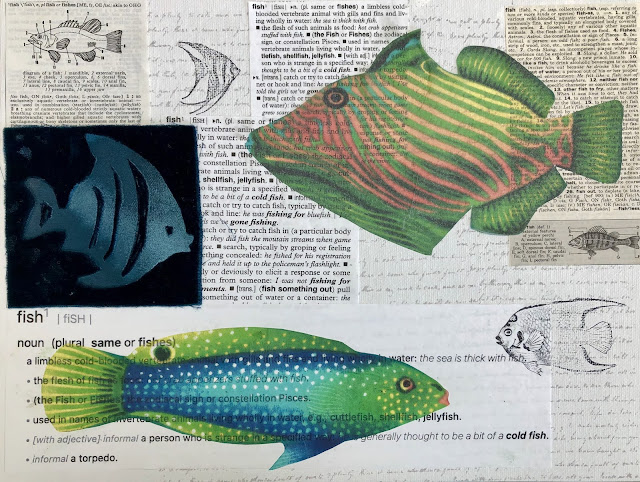
The prompt for this month's collage was Fish. I used the same techniques I used last month: pages cut out of an old encyclopedia and dictionaries. The colored fish images were copied from a fish fabric and printed on tracing paper so that the words would show through. I used a handmade stamp to emboss the velvet and used some old rubber stamps of fish. Also a rubber stamp with not-really words. All were glued onto a 9 x13 canvas board.