Thursday, December 24, 2020

Shimmer and Shine

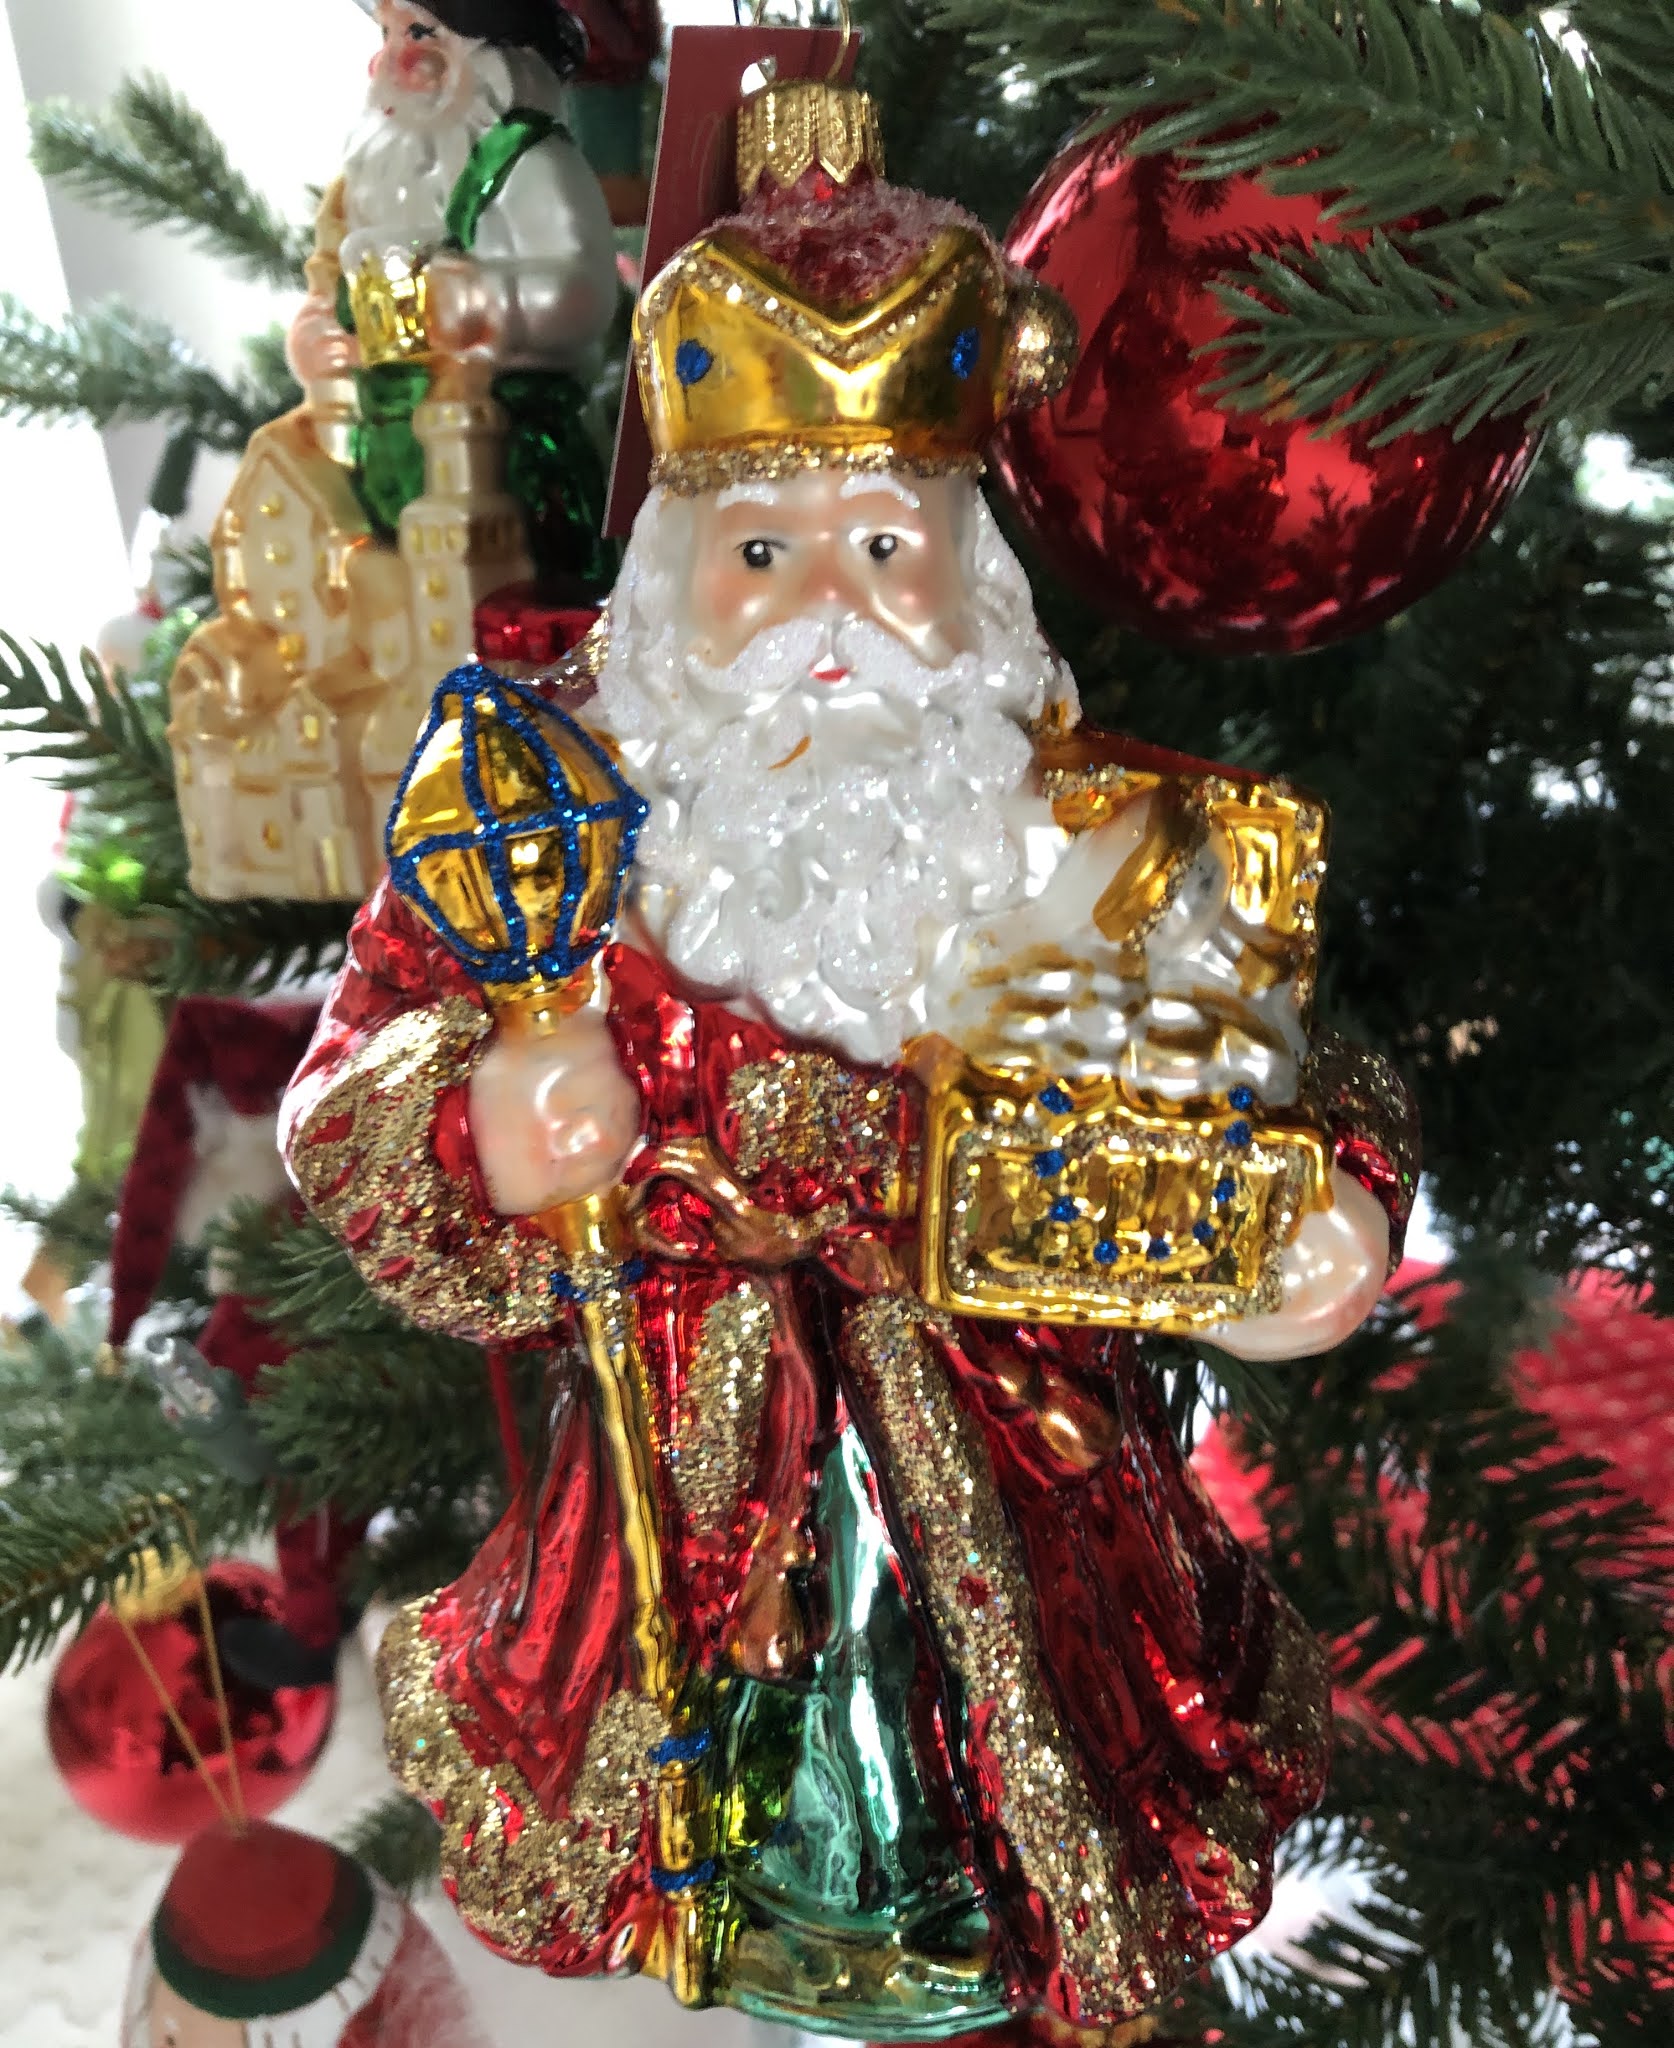
 I started making these Paula Nadelstern ornaments while I was in Florida. I made several following Paula's excellent directions on her website and her beautiful kaleidoscopic fabrics and lots of sequins, beads and colored head pins.

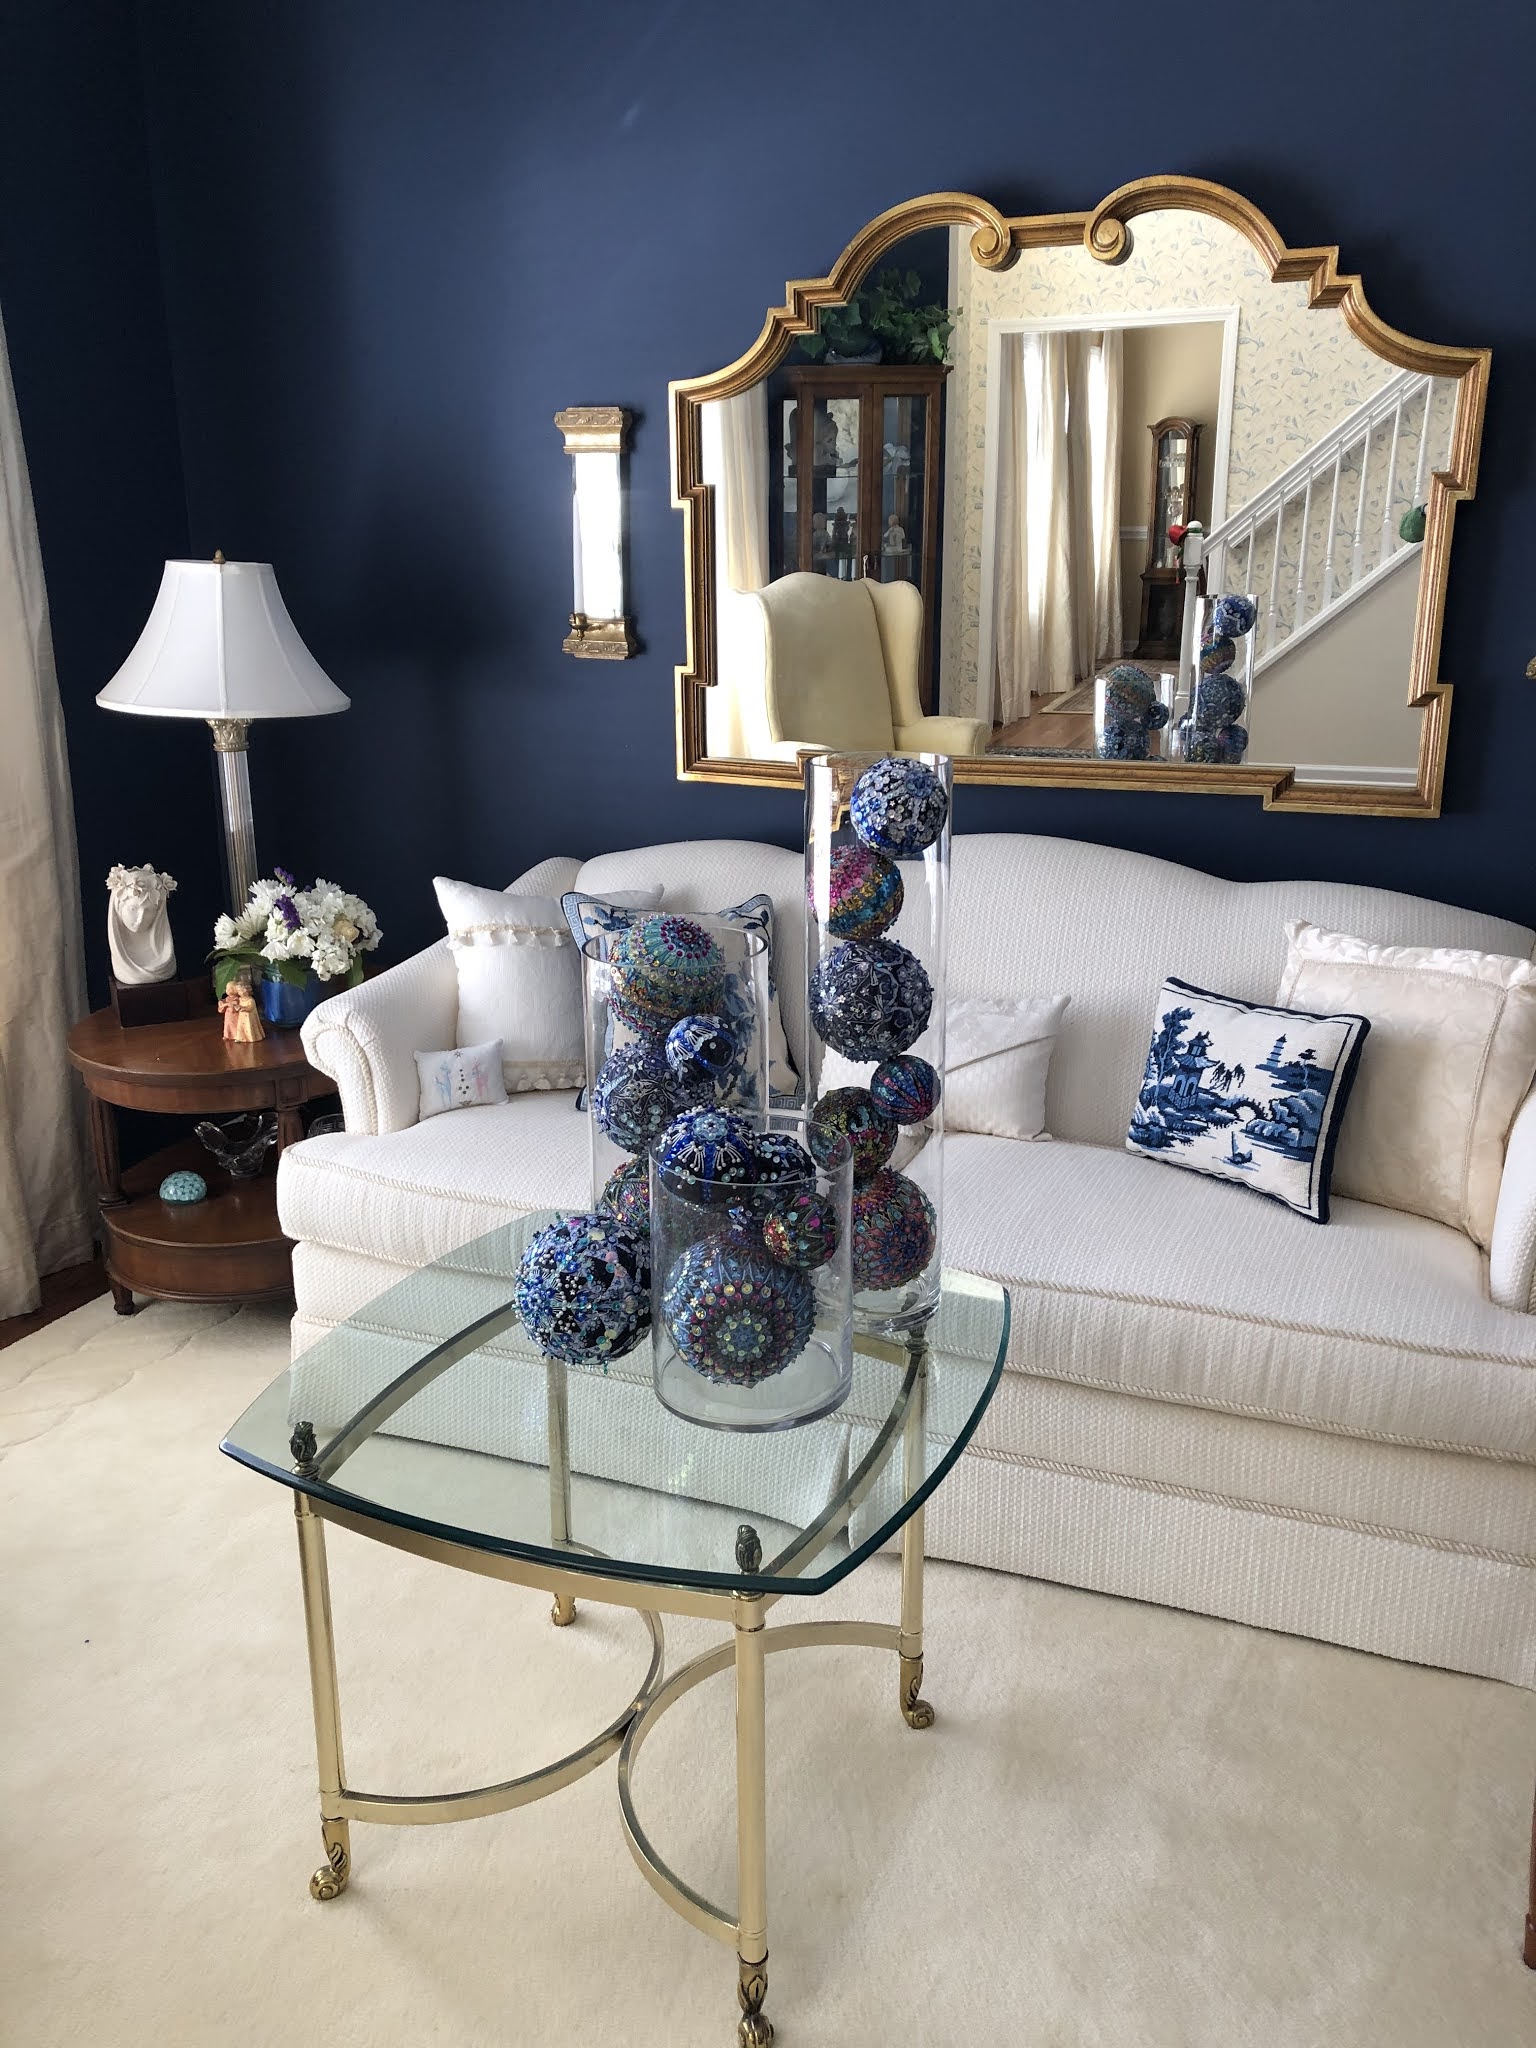
When I got back from Florida at the end of March I piled them in a big glass bowl on my dining room table. I had originally made these to use as Christmas decor, but I liked they way they looked on the table. I had bought this bowl while on a Viking River Cruise through Germany. We went to a glass blowers shop where the owner had worked for Dale Chihuly. While the bowl was expensive, it was a tenth of the price of a real Chaiuly and much more practical. His bowls are paper thin, but this one is very sturdy and I have used it empty or full in various places in my home. 


I wanted them to be a statement piece for the holidays in my small living room.  I sent away for clear glass columns in three different sizes. One is 24 inches high and 6 inches in diameter, the next is 16 inches by 8 and the shorter is 10 by 8 inches. I had to make several more balls to fill them up and smaller ones to fill the "chinks".  If you click on any picture you will get a bigger view to see more detail.


I like the way you can see all of the balls if you walk around the table. Piled in the glass bowl you lost the ones on the bottom. 


There is usually a 6 foot slim tree in this room with silver and white ornaments in front of the window, but I did not put it up  this year. I only put up my Santa tree in the family room, so the ornaments are my tree this year. 


The first ornaments were made using 6, 5, and 4 inch diameter balls, but when I started piling them in the column I still had small spaces to fill. These last balls were only 3 inches. I didn't know if it would work on such small balls, but it did and it took a lot less time to do all the sequins. I only used flat sequins on these little balls because I didn't want anything sticking out and impeding their fitting in the column. 
The ball in front is the only one of all the balls I made that is the same on both ends. I was able to get them to meet and match. Each of these balls is made from a different fabric. I loved making these even if they were fiddly and time consuming, but I have more than I need right now. Maybe I'll make some for Christmas gifts next year. I still have plenty of fabric and embellishments left. 

 This as been a difficult year for all of us, but there is a light at the end of the tunnel with the vaccine and a grown up in the White House. I'm wishing you all a very Merry Christmas and holiday season and a much better 2021.


I'm linking up with Off the Wall Friday.


Thursday, December 17, 2020

Violet Protest Project

 At my SAQA Zoom meeting last week one of the members shared what she had done for the Violet Protest Project. I was intrigued and investigated it and decided that this was something that I would like to do. You can read all about it here.

To briefly sum it up, we are trying to send the message that we are one country, not just red states and blue states. We are trying to get 26,750 eight inch squares, enough to send 50 to each member of Congress. The squares are to have an equal amount of red and blue to give the illusion of violet or purple. They will be displayed as a huge installation at the Phoenix Art Museum in Spring 2021 before being mailed to Congress.

The squares do not have to be quilts, but can be any type of fiber....knitted, woven, crocheted, appliquéd, felted, etc. as long as it is fiber.

Squares are to be mailed by Feb. 1, so if this interests you, there is plenty of time for you to participate. When you sign up and commit you have to do it in multiples of five. I signed up for five and below are the squares that I am sending. 


Skinny, wiggly piecing. I have done a lot of this over the years, but it has been awhile and I had to refresh my memory.


Wonky Log Cabin


This looks like it is pieced, but it is not. I took two squares of fabric, each backed with Wonder Under
and cut into curvy strips with a rotary cutter. Then the strips are woven together and fused down. Very easy to do.


Same technique as the square above, but with deeper curves.


Positive, negative. This is a fun technique. I chose the butterfly because it is a symbol of hope. I did not bind these little quilt squares, but used a machine buttonhole stitch around the edges. Also, no sleeve is required, so these went pretty fast, completing them in two days.


I am linking up with Off the Wall Friday.

Thursday, December 10, 2020

Santa, Baby, Encore

 A couple of weeks ago I told you about my Santa tree that was entered in the contest for Ann's Place. You can read all about it here. I'm pleased to say that I was fourth out of sixty-six trees and won third runner up. I garnered 1,809 votes, which meant $1,809 for the charity and I won $250, which I donated right back to Ann's Place. 

I started my Santa tree about 25 years ago when it was a small four foot table top tree. The ornaments were mostly small and many of them were fabric, cloth and resin. A few years ago I changed to a 7 1/5 foot tree in the family room and started adding larger glass ornaments. I would retire some of the smaller ornaments to make room for the bigger glass ones. I also added plain red balls to add more sparkle. 

I usually buy one or two new ones each year but this year I found a bonanza at Home Goods. They had a small collection of great glass boxed ornaments made in Poland, where they make the best glass ornaments, for a fabulous price and I couldn't resist buying these four guys.


I bought this long sleeve T-shirt last year at Kohl's for a pittance. Pretty cute, I think.


I found this video on Youtube of the inimitable Earth Kitt singing Santa Baby, as no one else can.


I finally finished my last charity quilt. The duct tape holding down the throat plate worked like a charm, although I was able to get a new one online which  hasn't arrived yet, 


All of these blocks came from the same fabric. I probably should have photographed the fabric first, but those turquoise and navy stripes went through the center of the fabric. I redistributed them when doing the piecing.


I especially liked the pop of red in my flanged piping. I quilted the border in red, too, using the same garlic design. 

I am linking up with Off the Wall Friday.


Thursday, December 3, 2020

Sewing Machine Woes and a Collage

 You've heard me singing the praises of my old 1230 Bernina sewing machine. It was just humming along doing great free-motion quilting, although the throat plate kept slipping a bit. I was able to pop in back in place until I was about 7/8 of the way through. Then I broke 4 needles in about ten minutes. I took the throat plate off and saw that there were 2 little spring clips on the underside. One of them was loose and that's why it kept slipping. I found my set of teeny, tiny screwdrivers and it split the screw in half.  So I gave a deep sigh and decided that I would drop this machine off when I picked up my other one. 

No machine for over a week. Fortunately I had other things to do. But now I want to finish that red quilt and I want to make a Christmas mask or two. I don't know why I didn't think of it before, but today I thought of the fix-all for so many things......duct tape. And guess what? It worked! I did a sample run of free-motion quilting and it did not slip at all. It does mean that I will have to remove the tape whenever I want to clean out the lint, but that will do until I can get this little screw. 


The prompt for this month's challenge was Ice or Water. I chose ice, mainly because I had this great Hot Potato Stamp of a snowflake. I had to dye a little piece of white velvet blue and I got the right color the first time. As before I used pages from an old encyclopedia and dictionaries. I found some good pictures online that I printed onto tracing paper so that the words beneath would show through. I also used a stencil with some white modeling paste on the lower photo of icicles. And I had a cute little stamp of a snowflake that I printed in blue. 

I am linking up with Off the Wall Friday.