Friday, January 29, 2016

Surface Design

I spent a bit of time this week on surface design, mostly using soy wax resist, painting with thickened dyes, and bleach discharge. For most of the pieces I started with a less-than-lovely hand dyed piece of fabric. Under each picture I will tell you what was done to that one.

Hand dyed fabric in variegated colors, soy wax applied with potato masher, dye painted with deep purple.

Hand dyed fabric, soy wax applied with a wide sponge brush into which I had cut notches, dye painted with Deep Purple.

Hand dyed fabric in yellowy green, soy wax applied with two different sizes of sponge pouncers,  dye painted with Amethyst,  stamped with bleach gel stick after washing out wax and dye.

White fabric with soy wax applied with sea sponge, then dye painted with Amethyst.

Hand dyed fabric, green on one end and orange on the other, soy wax applied with sea sponge,  dye painted Deep Purple.

Hand dyed fabric, soy wax applied with notched sponge brush, thickened dye painted in Amethyst applied only where the soy wax was and then dribbled throughout.

A very ugly shibori (of sorts) fabric, soy wax applied with round sponge, painted with Evergreen thickened dye. I don't know where those rusty streaks came from, but this is one of my favorite pieces.
Hand dyed fabric, turquoise at one end orange at the other, Soy wax applied with cardboard  tubes in two sized. Dye painted with Evergreen. Bleach discharged using Clorox bleach Pen and rubber stamps in three rows.


I  had quite a few others that were not as successful and I may over-dye them.  But my big project this weekend will be cleaning out my studio closet. It is a nice big square walk-in closet outfitted with shelves and it is a mess, long overdue for an overhaul. There now I've put it in writing, so I'll have to do it. 

I'm linking up with Off the Wall Friday.

Thursday, January 21, 2016

One Last Project

Lately all I've been working on is projects for one or the other of my fiber art groups or things for the Woman's Club annual arts and craft competition. I can no longer enter quilts, since I am considered a pro, so I come up with other things to make. There are a lot of categories.

Today I finished my last one and now I can get on to doing what I really love, quilting and surface design. Not to say that I didn't have fun doing these other projects, because I did.

This last one, a handbag started with a card of vintage buttons ( know, I know, more buttons) bought at a flea market in South America, don't remember the city. I think they must have been a little pricey because I didn't buy them immediately, but kept going back to look at them before I succumbed. This was a few years ago and I couldn't think of how to use them to their best advantage until I saw this pattern for a cute little handbag.


I fell in love with their luster and somewhat metallic look. You can see how old they are by the card, the back being very yellowed and they are all sewn on by hand. Are they Mother of Pearl? I don't know.


Here's the cute little bag. It is quite small and the handles are just bangle bracelets. They used beads instead buttons.  I liked the free motion quilting, too, right up my alley.


Here's the book it came from, a very nice one with a lot of good ideas and very clear directions. I made my bag twice as big as the one shown.


And here's my bag. I used a hand dyed fabric that I thought was a good companion to the buttons. It looks a little pinkish here. The next photo is a truer color. I used all 36 of the buttons that were on the card.  It's a nice size, about 16" wide by 12" deep. I lined it with more of the same fabric.


 I made the straps out of gray webbing that I covered with fabric on one side. They are long enough to use as a shoulder bag, which is what I like to use. I will definitely use this one.

I'm linking up with Off the Wall Friday.

Wednesday, January 20, 2016

Wordless Wednesday

A little ray of sunshine on my kitchen table on this cold winter day.

Monday, January 18, 2016

Soy Wax Resist

I've been wanting to try soy wax resist for a while. I even had the soy wax pellets. Wax is used as a resist when making batik fabric. The traditional way uses a paraffin type wax which has to be melted off the finished fabric, not an easy thing to do. It produces noxious fumes and can be dangerous. Soy wax works just the same, but it can be washed out in the washing machine with hot water.
What has been holding me back is that I was hoping to find a used electric frying pan at the thrift shop to melt the wax. No such luck, but a friend recently gifted me one, so I have done a very little experimenting.
Just in case you don't know what a resist is, it is something applied to a fabric that will keep the dye or paint you are applying from those resist areas.


These don't look very exciting, but I used some snow dyed fabrics and then applied the wax with kitchen utensils. Basically you dip whatever you are using into the hot wax, then apply it to the fabric. You have to wait an hour or so for the wax to totally harden. When it is hard you brush on your thickened dyes, another new process for me.


Here you can easily see what kitchen implements I used. The circles are from a drinking glass. I used blue as my dye because I had some left over from my Fiber Fall. I have so much to learn. I will use a bright fabric as my background and some different tools for applying the wax.

My fiber art group is going to have a play date at one member's unfinished basement this Friday where we can do messy things. This is what I want to play with.

Sunday, January 17, 2016

Fiber Fall #3

This is my third and last Fiber Fall. If you don't know what I'm talking about, please look at my two previous posts

For this one I used Oil of Olay face cleaners. They come with cleanser impregnated and you have to wet them to use. I've been using them for years and they take off every bit of war paint makeup. They are meant to be thrown away after one use.
They are pretty disgusting after using, being covered in foundation and eye makeup, but a few years ago I started to save them. I would wait until I had  bunch and then washed them and bleached them. Now I didn't save them for years, but I still had a nice pile. I thought I would somehow use them in a quilt, as I had used Dye Grabbers.

This is what it looks like after washing. It is sort of a paper cloth. They cannot be torn and are very sturdy.


They used to come in these neat plastic boxes with a hinged lid. I never threw one away, being so useful for corralling small items. This one has picture hanging hardware. Now they just come wrapped in plastic and then in a paper box.


I cut them into 4 inch squares and then dyed them in a dark to light navy blue. They took the dye beautifully. After dyeing I put them on freezer paper and coated them with Stiffy, making them very stiff, which is just what I wanted.


The 8 foot length hanging in my living room window. I fully intended to stamp these with some Hot Potato stamps that I had, but no matter what kind of paint or ink I used, they didn't show up. I also tried stenciling with paint and Shiva paint sticks, but that didn't work either. So I went through my box of spangles and found a lot of flat round ones in a few different sizes and applied them with acrylic medium. It gave a somewhat sparkly polka-dot look.


So I am finished with that project. Now I am going on to Soy Wax resist dyeing. Please come back.

Wednesday, January 13, 2016

Fiber Fall #2

If you did not read my last post, please do so now or this one won't make any sense.

For this, my second Fiber Fall I cut up a quilt I had made a few years ago. It had some wonderful fabrics, including some hand dyes, some Dupioni silk and some cotton damask and I loved the quilting on it. But it was out of balance and although it did go into a group show, I never really liked it. I recently unearthed it and thought I might be able to save it by painting the whole thing with latex wall paint, as I have done before, but I still didn't like it. Soooooo, it was perfect for this project, to be cut up into squares.


As in my last post, the only place tall enough to hang it was my living room window. It is a sunny day, so I had to deal with back lighting, even though the blinds were closed. The squares twist and turn, allowing you to see both sides.


Here they are layed out on the floor with the pieced/painted sides up. I wish I had taken a picture of the quilt before it was painted and before it was cut up, but I did not.


This is the reverse side or what was the back of the quilt. I like the way the quilting shows.


I had a few squares left over and discovered that they are the perfect size for coasters. I may make some more.

I am working on Fiber Fall #3 and it is very different from these first two, so please come back.

I'm linking up with Off The Wall Friday.

Tuesday, January 12, 2016

Detour

I hope you're not here looking to see the finished jacket I blogged about last time. I hit a major snag (such as cutting the wrong size) argh!!! I can fix it but for now I am going on to other things and I will get back to it. Later!

FANE (Fiber Artists of the North East), a group of which I am a member, puts on a special exhibit at our local guild show every year. For many years the show has been held in a high school and our group was given a class room for our display. We have done some interesting and unusual displays, such as totems that hung from the ceiling, kimono-like pieces that were displayed on wooden stands, large cubes covered in fabric, and others.

The high school where the show was held for many years has booted us out for various reasons and we had to scamper to find a new venue, which we did. This year it will be in the huge O'Neil Athletic Center at Western CT State University in Danbury. It is a very large space, which is used for many things and the quilt displays and all the vendors will be in the same room. So we had to think of something for our group that would work in this space. After a lot of brain storming we decided to make chains of fiber art that will hang from pipes like the ones that are used to display quilts. They will be in a zig-zag formation, which will give us a curtain effect. Sort of like those beaded curtains from the 70's, only made from fiber.

The chains, which we are calling Fiber Falls, are to be 8 feet long consisting of geometric shapes, no smaller that 3 inches, no larger than 5. They can be made of any kind of fiber and they must be attractive from both sides with spaces no more than 2 inches between. Each member is to make at least three chains. They do not have to match, but each chain should be cohesive.

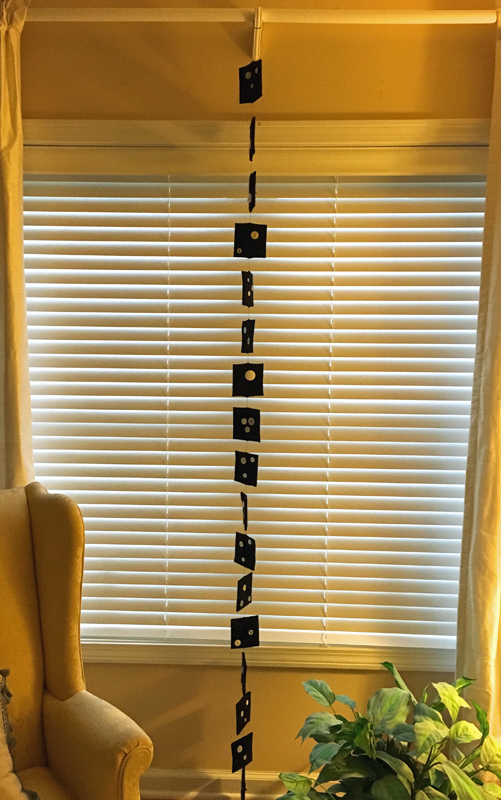
Coming off my button projects and my felted sweaters, I finished my first one today. I pulled out a black sweater that I had felted twice last year and then I felted it three more times. I wanted my squares to be rigid. Now is where the buttons come in. I sewed glued on buttons on each side. Actually my plan was to sew them on using black thread, but after the first square, I decided that gel medium was the way to go. After they were all glued on I took a black Sharpie and drew on thread lines. Sneaky. I know!


The only place I could hang it for a picture was from the curtain rod in my living room. What you can't see in the picture is that they twist and turn with the slightest breeze.


I didn't realize how heavy these would be. Between the weight of the felted squares and the buttons, it is heftier that I thought. You can see how is is pulling a bit at the tops of the squares. I did use a heavy button hole thread, but I hope that the squares hold up.


Here is it turned on itself on the floor.


My squares are 3 3/4 inch and one inch apart.


My other two Fiber Falls are in the works and are totally different than this one, so come back and see what I've done.

Tuesday, January 5, 2016

New Project

When my sister and I go to the big quilt show in Houston every year we always say to each other, "Remember, this year, NO jacket patterns!" We have been enticed by so many jacket patterns that we either do not use or that turn out disastrously. I have had some successes, but more than a few flops.
Two years ago we were swept up by Londra's booth, where she had the most amazing jackets built on a sweatshirt base, which she also sells. They do not look like your typical sweatshirt jackets. Go check out her website to see. The sweatshirts that she sells are oversized since you use the cut-up shirt as fabric. I bought a 3XXX and I take a small. Ruthie and I each bought a different pattern booklet, each featuring 3 different designs, thinking that we would share.

Do I have to tell you that neither of us made a jacket? Every time I came across the pattern it was mocking me.This year she had a booth and we looked again. I tried on some of her samples and was determined to make it this year.

Now only two months after the show, I decided to get to work. For me one of the best parts of a new project, quilt or garment, is picking out the fabric. I went through my stash of hand-dyes and found what I think will be perfect complements to to the sweatshirt.


The fabric on the left is an ice dye and the ones on the right some hand dyed gradations.


I bought these fabulous glass buttons several years ago at our local guild show and I think they will be just the finishing touch for this. Stay tuned and I will show you the finished product.